
Modular 2.5 inches drives bay
Baie pour disques 2.5 pouces modulaires
Part list / Liste des pièces
For a N drives bay / Pour une baie de N disques
1 x droite.stl
1 x gauche.stl
N x rack.stl
N-1 x intermediaire.stl
Optionnal: N x guide LED.stl
Others:
4 x M4 bolts and nuts, length depends on how many drives you put together.
N x SATA extension cable
The SATA extension cable is to be glued into the slots made for it. Depending on the one you get, you may need to remove the locking thing into it, otherwise the drive will be really hard to pull out from the bay.
If you plan to use this with the raspberry, you will face the power issue. Either take USB 2.0 Y cable, but if you have a PI4 and want to keep USB 3.0 speed, do as I did. Cut the male side of the exntension cord, plug data side into the USB/SATA adapter and the power side into a 5V power supply.
See the last two pictures, even though it is quite in beta stage for now…
Print Settings
Printer brand: Creality
Printer: Ender 3 Pro
Rafts: No
Supports: No
Resolution: 0.2
Infill: 20%
Filament_brand: Creality
Filament_color: Black
Filament_material: PLA
Notes:
Brim recommanded
Printed with 0.4 nozzle
if you want to use a larger nozzle, you may need to modify the file to thicken the thin wall holding the place for the LED light duct insert.
Or if you need it, I could provide the updated file and add it to the things. Keep in mind that default one is for 0.4mm nozzle.
How I Designed This
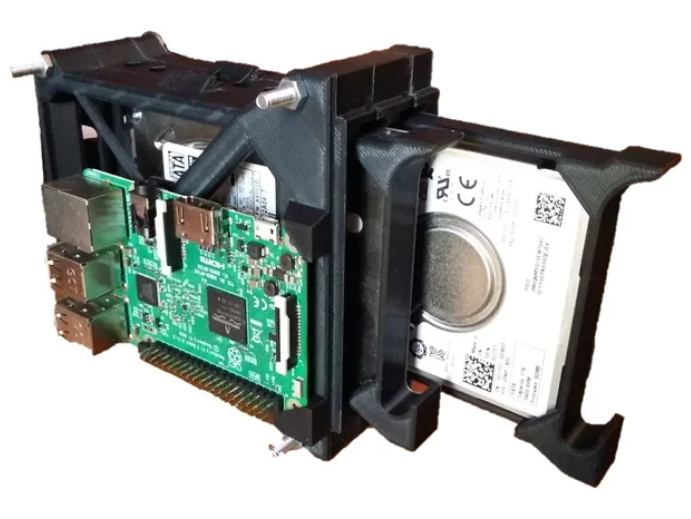
I needed some kind of case for my raspberry pi home server which uses two 2.5″ drives.
Being unable to find what I needed on the Internet, I decided to make my own.
That’s what you get now, a modular design which allow to scale from 1 to as many drives you want. No support needed, 20% infill is way enough.
The thing has 4 parts:
Two side parts. Put together you got a single drive rack.
The HDD rack, which requires no screws (the drive fits into it and is firmely secured).
The intermediate piece that allow to have more drives side by side.
The thing is held together with M4 screws or threaded rods or anything that fits into the four holes which go through every parts.
You may notice the 5th piece, which is a light duct, meant to be placed at the top of each bay, there is a thin wall to remove to be able to place it, making it optional, and keeping the design from needing support on this spot.
That one should be printed using some translucent filament.
You then shoud drill a hole at the back of the light duck to put a led or for my case, an optical fiber, the other side being glued against the USB to SATA adapter’s activity LED.
For my project I needed only 2 drives, but… As I said, print 19 intermediate parts and you get a 20 HDD rack…
I designed this to print without support, just be carefull to print it on that flat side, as shown on pictures (red models)… I recommands to print using brims, it prevents the corner from stiking out.
I’m working on a case to pack everything up (power supply, raspberry pi 3/4, 2 drives and cables, with a nice access to the remaining USB port and Ethernet from outside.
I’ll release it as soon as it is done.
I may post some intermediate designs, meant to be used with this one. So check them out if you’re interested.
Credits:
mutrised
Download 3D models
| File | File size |
|---|---|
 Modular+2.5+inch+HDD+rack+HotSwap
|
2 MB |