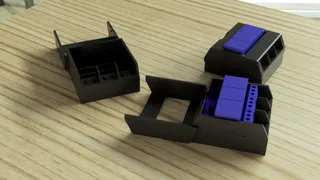
Moon Rocket / Fusée lunaire - 700% stand with ESP32 D1 Mini holder
Description
PDFRelated model: https://www.printables.com/model/163971-moon-rocket-fusee-lunaire
If you want to use a D1 mini with an USB-C port and no button you can print this remix instead: https://www.printables.com/model/836021-moon-rocket-700-stand-with-d1-mini-usb-c-holder
-
I decided to control the LEDs of the moon rocket I printed using an ESP32 D1 mini (https://www.az-delivery.de/fr/products/esp32-d1-mini) and needed a stand that could hold it and expose the USB port.
The design is made for the 700% scaled up version of the rocket so you'll need a bed of at least 20x20cm to print it.
The plume should fit directly into the top part of the stand (built-in clearance of 0.2mm) and can then be glued to it (but that's not a requirement)
The bottom part and feet can then be attached to the top part using M3 screws and heat set inserts.
The 3D printed button should be coated with a conductive material (or electroplated) and connected to one of the GPIOs pins of the ESP32 to control the LEDs. If the button moves too much you can use a longer M3 screw to stop it.
I also added the LEDs holder that I made. It takes 3x 5mm LEDs and has enough space in its central hole for 4x 22 AWG wires. In my case, each one of them is connected in serie with a resistor to a GPIO pin of the ESP32 (which allows to adjust their brightness and/or animate them independently). Here is a code snippet that can then be used to control them: https://gist.github.com/Lyrkan/59891d932db17d82d41ad3e4b35aedc2
-
Printing advices:
- Enable supports (you won't be needing a lot of them if the parts are printed in the right orientation)
- Infill is not required but you'll have to be careful how bridges are orientated so their lengths do not exceed the capabilities of your printer. I recommend adding some low infill or an adaptive one if you have any doubt.
- Make sure that seams are placed either at corners or in the back of the top part
- For the prints you can see in the pictures I:
- processed the STL file in Blender to add some wood texturing (displace modifier)
- printed the resulting model in an Eryone wood filament
- lightly sanded the result
- used wood stain on it
Tags
Model origin
The author marked this model as their own original creation.


