Slice Mosquito Assembly Jig
Slice Mosquito Assembly Jig


Print Profile(0)
No Print Profile yet. Add one to earn points.
Description
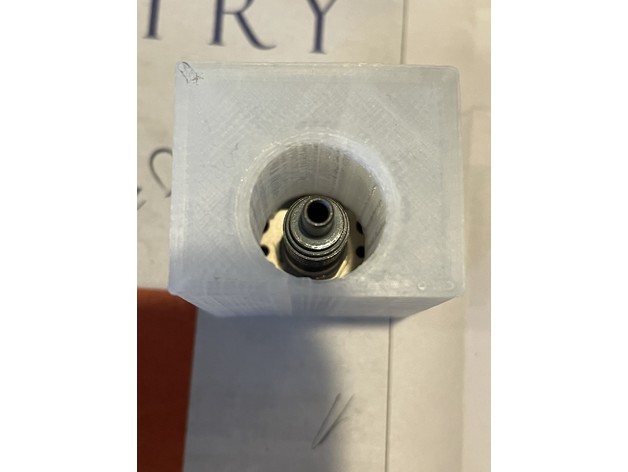
Assembly and disassembly jig for the Slice Engineering Mosquito and Mosquito Magnum hotends.
This keeps everything aligned when you're torqueing the heat break bushing onto (and off of) the hot block. It fits both regular Mosquito and Mosquito Magnum, with the thermistor, heater cartridge, and retaining screws removed.
The STL is designed for a socket with a 13mm outer diameter, give or take; if yours is much larger (or smaller), use the OpenSCAD and the .scad file to generate a new STL. If you need to work on a Mosquito with the thermistor, heater, and/or retaining screws in place, you'll need to modify the STL (or do a lot of scad redesign).
An added benefit is that you can grab the jig with pliers to hold it in place as you torque, instead of having to grab the hotend itself and risk scratching it up. I do recommend pliers as I found it difficult to keep it from turning as I applied the 4 Nm of torque, which is actually a fair amount of force.
Tip: when tightening to a specific torque, be careful not to allow the socket to rub against the jig too hard or it might affect the torque measurement. I think the steel should slide easily against most rigid plastics but better safe than sorry.
Use Instructions:
- Print the model
- Remove the heat sink, tubes, retaining screws, and any heater or thermistor -- only the hot block and heat break should remain
- If assembling, thread heat break onto hot block and finger tighten
- Turn hotend and jig upside down and insert, then turn back over and set on a table
- Hold jig with hotend down against table with pliers
- Insert socket of properly adjusted torque wrench into top and engage with bushing
- Tighten or loosen accordingly
History:
When I first assembled my first Mosquito, I followed the directions to fully take it apart and apply boron nitride paste. Unfortunately, as I was tightening the bushing to 4 Nm with my torque wrench and 9mm deep socket, the socket tilted off the bushing and bent the very thin filament tube. I cursed myself for carelessly destroying my shiny new hotend and costing myself a $35 replacement part and shipping time before I could proceed. (Slice was sympathetic and offered me a discount. Their support is great.)
Luckily I was somehow able to bend the tube back to normal without breaking it, and it even seemed to pop back into round. I haven't seen any issues in the months or year that I've been printing with it.
However, not wanting to experience this stress again, I designed this jig to hold the mosquito in place and constrict the movement of the socket so it couldn't bend the tube of my new Mosquito Magnum.
Disclaimer: I am not responsible for any damage you cause to your hotend, printer, self, house, cat, or anything else.
Print Settings
Printer Brand:
Creality
Printer:
CR-10S
Rafts:
No
Supports:
No
Resolution:
0.2
Infill:
15%
Filament:3D Solutech PLA Natural Clear
Notes:
Any material should be fine. I just used some PLA that I was trying to get rid of. And the pictures are actually of one I printed on my New Matter mod-t small backup printer since my CR-10S5 hotend was already disassembled.