AMS Purge Calibration

AMS Purge Calibration

Boost
168
298
38

Print Profile(5)

All
P1S
P1P
X1
X1 Carbon
X1E
A1

0.2mm layer, 2 walls, 15% infill
Designer
15 min
1 plate
4.6(10)

0.2mm layer, 2 walls, 15% infill
Designer
9 min
1 plate
5.0(6)

0.2mm layer, 2 walls, 15% infill
Designer
27 min
1 plate
5.0(3)

0.2mm layer, 2 walls, 15% infill
Designer
12 min
1 plate
5.0(2)
Click to see more

Boost
168
298
38
0
466
358
Released

Description

One of the worst and most stressful things about using AMS is the amount of purged filament that gets wasted, without considering the additional time for each print.

So, I decided to create this simple file without having to make any modifications to the gcode or anything else.

The goal, therefore, is to minimize the amount of filament during each purge.

The only necessary tool is a caliper, but you can also use a simple ruler.


You start by setting all the purges to 50mm³


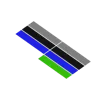
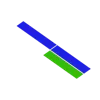
Once you've chosen which filament to calibrate, through the slicer, you set the correct sequence of chosen colors.

A simple example is the photo below.

All that's left to do is start the print and wait.

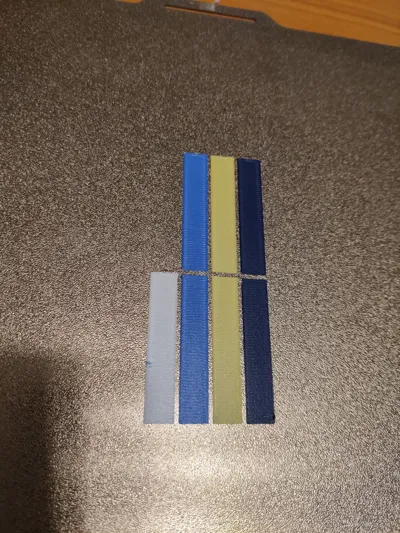
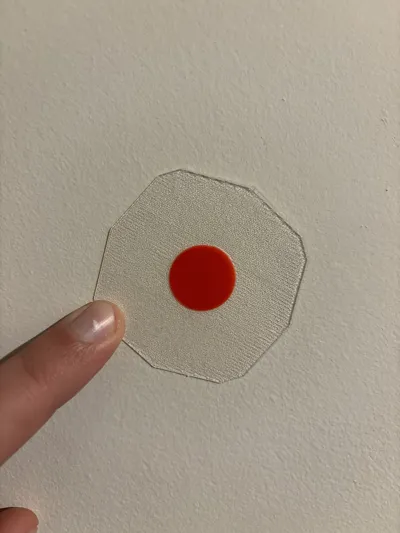
What you will see in front of you will be something like this.

At this point, our friend, the caliper or ruler (depending on how precise you want to be), comes into play.

What you need to measure is the moment when the color you've chosen stops blending with the previous color and finally takes on its clean color.


In this case, to transition from gray to blue, 48mm are needed.

Now, using a simple formula, you can calculate the final value to input into the slicer.

Each rectangle is exactly 100mm³.

So, you need to multiply the measured value by 2 and add it to the 50mm³ set previously.

Therefore:


Vdef = (Vmeasured x 2) + 50 = (48 x 2) + 50 = 146


Now, I will input 146mm³ to make the color change from gray to blue.


This process should be performed for all color changes and all possible combinations.

In case the first rectangle is not enough, the one below will complete the purge.

Just keep in mind that in the formula, in addition to the 50, the value of the first rectangle, which is 100, should also be included.


For example, as it happened to me for the change from black to gray, I measured the second rectangle, finding 13mm, and then I applied the formula again, adding the value of the first rectangle.


So, the calculation would be:


Vdef = (Vmeasured x 2) + 50 + 100 = (13 x 2) + 50 + 100 = 176


Therefore, I would input 176mm³ to facilitate the color change from black to gray.


Using this method allows you to significantly reduce the amount of purged filament without affecting the color you'll load afterward.

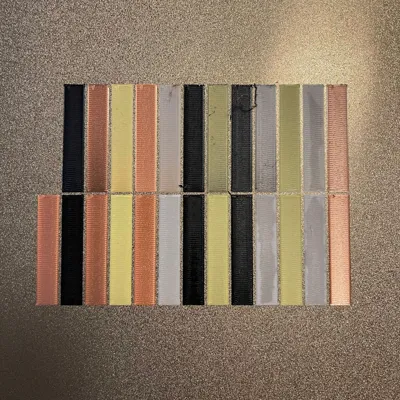
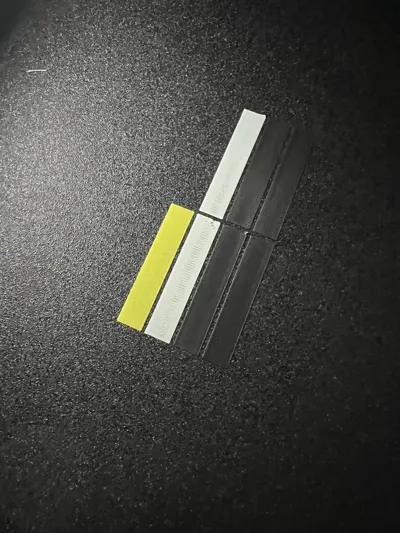
In the photo below, you can see the amount of filament that has been purged using this technique.


Comparing it with the slicer's automatic calculation, the difference is quite evident.

This technique allows you to reduce purging by 30% or even less, depending on how precise your measurements are.


BEFORE

AFTER


I hope this simple idea can help you, as it helped me, to reduce the amount of filament wasted during color changes.

Wishing everyone happy printing and lots of fun!


Comment & Rating (38)

Please fill in your opinion
(0/5000)

Are you sure this solely is your idea? Why does it look awfully similar to my better purge Gcode on printables, is based on the same .stl files & related methodology? Even the style of the documentation resembles mine. In your text you even brag “…without having to make any modifications to the gcode or anything else.”? I do see your upload as skim off and I am not okay with this!
The designer has replied
1
Reply
Hello AMT_MW, To be honest, I haven't even considered your project that you posted on Printables, and even if I had, you haven't published anything about it here on MakerWord. There was another guy who had posted something similar to yours and marked it as "public domain." Checking your project, you also modify the printer's Gcode to print it. The main issue is that yours, like the other guy's, doesn't work, as the slicer doesn't allow you to print it, rendering the file useless! That being said, it doesn't take a degree to create a 0.2mm high rectangle on Fusion360 😅. I've been using this method privately for a while, but since MakerWord came out, I decided to make it public. I don't think it's plagiarism at all, as the printing process on yours is quite different. Regarding the purge calculation, in your file and the other guy's, the method is the same, as it is in other files on Printables as well. In any case, your file modifies the Gcode, mine doesn't. So I don't understand why you identify it as plagiarism.
4
Reply
If, despite my explanation and considerations regarding the project's development, it still causes you discomfort (even though, to me, it wouldn't make sense since they function in two different ways), I can still modify the project and turn it into a remix of yours. If that's not possible, I can mention you in the description. But, as I mentioned, it doesn't seem like plagiarism to me at all.
2
Reply
Replying to @Ciuf_Ciuf :
The formatting may look awful but I am answering point by point. "To be honest, I haven't even considered your project that you posted on Printables, and even if I had, you haven't published anything about it here on MakerWord." • With the similarities found, I honestly have my doubts. I don't get the point of the platform used for an upload. "There was another guy who had posted something similar to yours and marked it as "public domain." " • What is the argument here? Analogous to mine or in parts literally the same is way different. - But would want to comment on “public domain”: It does not have to translate to “grab it, forget about who made it and run with it”. Example: Peter Farell might have chosen a license without reserving him any rights for his Octo Skull which you published here on Makerworld, but mentioning him while gaining benefits with his design would show good manners. "Checking your project, you also modify the printer's Gcode to print it." • That “also” is the keyword here. It simply is not necessary, the file and pattern is what I included to support the usage of my G-code. "The main issue is that yours, like the other guy's, doesn't work, as the slicer doesn't allow you to print it, rendering the file useless!" • So from your point of view the choice of a slicer is a determining factor?! I did include a simple file and described a certain method, exactly what is to be found in your upload here. Same geometry, same methodology, …, just what I described now slicer ready for Bambu Studio instead of OrcaSlicer and having a different initial offset. "That being said, it doesn't take a degree to create a 0.2mm high rectangle on Fusion360 😅." • Fair enough, even bigger things have been made/invented in parallel all the time. But usually one idea isn’t similar to one specific useful part of the other and at that awfully similar down to a nail. "I've been using this method privately for a while, but since MakerWord came out, I decided to make it public." • Nice, sharing is caring. Otherwise contains no argument. "I don't think it's plagiarism at all, as the printing process on yours is quite different." • At what point is it quite different? - For the calibration print the difference boils down to a different number to be noted as offset, literally everything else for the print is the same just rearranged. "Regarding the purge calculation, in your file and the other guy's, the method is the same, as it is in other files on Printables as well." • Second time you mention some other guy. Since I published my version I have seen a lot of different calibration prints/pattern pop up, I am aware of others that came before me as well. But again, none was that similar. "In any case, your file modifies the Gcode, mine doesn't." • One part of my upload is a modified G-code, another part is the calibration - and that is what your upload here is awfully similar to. "So I don't understand why you identify it as plagiarism." • With the risk of repeating myself: Because of the similarities and you even proudly pointing out in your description that no G-code change is required. - Who do you achieve this advantage over? The single upload that does this, with the same calibration file and methodology for it, that happens to be my upload months ago?! "If, despite my explanation and considerations regarding the project's development, it still causes you discomfort (even though, to me, it wouldn't make sense since they function in two different ways), I can still modify the project and turn it into a remix of yours. If that's not possible, I can mention you in the description. But, as I mentioned, it doesn't seem like plagiarism to me at all." • Yes, it still causes discomfort. Look Thomas, I am upset because your upload is way too similar compared to mine to be the result of pure coincidence. What your, mine and everyone else's upload with the intent to calibrate the flushing volumes actually is, is Bambu Lab’s homework which they still haven’t delivered on and once they do, our stuff is obsolete. If I had found an upload that simply had different/improved files, maybe mentioned where the idea for that upload came from and (if the inspiration indeed came from it) at best gave a link to the further going G-code upgrade, I may have embraced it like I did with other work derived from mine. There is no option to designate it as remix because my original does not allow remixes and for a somewhat related slough of reasons I am not changing that atm. Do as you please, I made my point, Makerworld seems to be not too interested and the only consequence will be people like me thinking twice if they are willing to share in future.
3
Reply
Print Profile
0.2mm layer, 2 walls, 15% infill
The old Version works better for me. This wasn't really succesful. After this calibration the yellow in the print result was blueish. I checked the 50mm settings twice to be sure.
0
Reply
Print Profile
True 4 color calibration. Each color is calibrated against the other 3
This saved me a lot of time and filament! Big thanks!
0
Reply
Print Profile
0.2mm layer, 2 walls, 15% infill
Worked well, simple to use / calibrate. Picture shows final result after calibration
(Edited)
0
Reply
Great idea! I have a question if you don't mind. Are the transition differences based on the material, the colour, the AMS slot or ..? I have dozens of colours, only 4 loaded at a time, doing this for all combinations has an exponential difficulty. i can understand that lighter colours might need a bit extra to become fully (visually) pure
The designer has replied
1
Reply
Thank you for the feedback. I'll try to respond, hoping I understood your question correctly. It was designed to affirm more or less color changes based on the current need. For example, if I have to make color changes like from gray to green or from gray to blue, fewer rectangles will be needed compared to the change from black to white or vice versa, just to give an example. This happens, as you say, based on the type of color used. It can be used with any material; you just need to set in the slicer which materials you are using. At the moment, unfortunately, Bambustudio doesn't have the ability to save the purges for color changes in the various possible combinations. I think this is a huge drawback. I am in the same situation as you, as I have a lot of colors available. One method I have thought of is creating an Excel spreadsheet where I have noted all the color changes I have tested so far. When needed, I refer to the corresponding entry on the Excel sheet. I know it's not a very practical method, but it's the only solution I found to remember everything. I hope I answered your question; if not, try phrasing it differently. I'm not a native English speaker, so I might not have fully understood your query.
1
Reply
Replying to @Ciuf_Ciuf :
you've answered it brilliantly, thanks for thay! Unfortunately this means additional bookkeeping to become less wasteful. It is what it is, I'm already super happy with your approach. Much appreciated 👍🏽
1
Reply
Replying to @DynomUlteavil :
I'm glad you liked it. It would be nice to reach as many people as possible because it's a very useful tool, after all. Unfortunately, it hasn't gained the visibility I was hoping for. Let's see in the future if we can share it better.
0
Reply
Print Profile
0.2mm layer, 2 walls, 15% infill
0
Reply
amazing, been looking for something like this.
2
Reply
Print Profile
0.2mm layer, 2 walls, 15% infill
perfetto
1
Reply
Print Profile
0.2mm layer, 2 walls, 15% infill
I like the concept. Thanks
0
Reply
Print Profile
0.2mm layer, 2 walls, 15% infill
Very nice for calculating flush amount.
0
Reply

License

This work is licensed under a Standard Digital File License.

You shall not share, sub-license, sell, rent, host, transfer, or distribute in any way the digital or 3D printed versions of this object, nor any other derivative work of this object in its digital or physical format (including - but not limited to - remixes of this object, and hosting on other digital platforms). The objects may not be used without permission in any way whatsoever in which you charge money, or collect fees.