OG star tracker
OG star tracker


Print Profile(2)

Description
You can now buy the kits and parts at OG star tech.
Meet OG Star tracker
Og star tracker is star tracker that is easier to make then ikea furniture. You might ask why I need star tracker. Star tracker is small equatorial mount that you need if you want to take pictures of night sky. Due to rotation of earth the stars on long exposures pictures are blured.
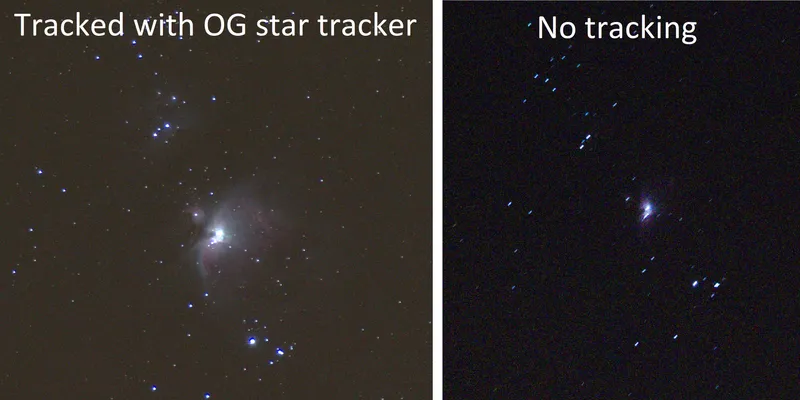
Shot on OG star tracker
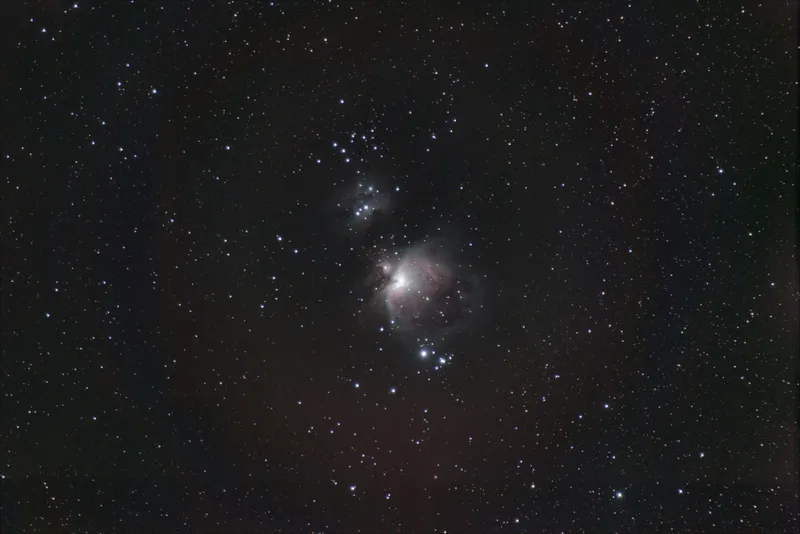
30s exposures 1h of exposure time.
My goal
My goal was to create an affordable and user-friendly star tracker that could be constructed for a mere $70. The design is such that minimal supports are required and no drilling or gluing is necessary. It is perfect for beginners, as it can be set up in just three minutes and is ready for use. The only additional item needed is a tripod, which can be a surveyor's tripod or a standard photographic tripod with either a 3/8 or 1/4 thread. The tracker is suitable for use at any latitude where people live and can withstand temperatures as low as -15 °C.
Important : New version is released new build guide is on the way.
Build instructions
You can find firmware on github under firmware folder with more instructions.
Discord : https://discord.gg/dyFKm79gKJ
Github : https://github.com/OndraGejdos/OG-star-tracker-
List of parts : https://docs.google.com/spreadsheets/d/1kcgIab0JqNLg5WMselIyCQLZJsu3P-vXLvSJgl1yHa8/edit#gid=0
Guides and updates on my website : http://www.ogstartech.com/guides/
Assembly guide part 1
Assebly guide part 2
Usage guide
Electronics guide
My road to this tracker
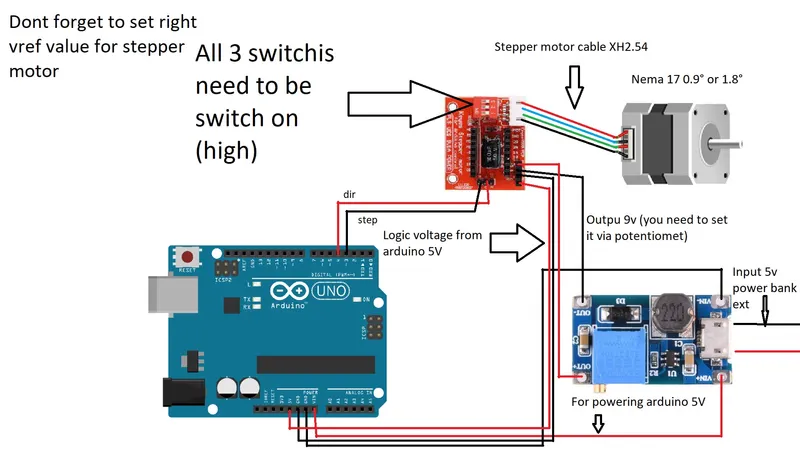
Wiring schematics :
Choosing parts
You need to main part that is adequate for your latitude. If you live betwen 0°-25° chose : Main bottom part 0-25 use supports , 25°-50° use : Main bottom part 25-50, 50°-65°+ up use : Main bottom part 45-65. If you live between 60°-65° you need to use Main part for laser (14mm) for north 60-65 and Cover and tightener for north 60-65 becaose normal parts would not work so north or south.
Firmware
You need to chose firmware based on your stepper motor. If you have stepper motor which has 400 steps per revolution chose : firmware simple for Arduino nano 0.9° . If you have 200 step per rotation stepper motor use : firmware simple for Arduino nano 1.8° . If you want to use different Arduino you might want to change out pins in code.
https://github.com/OndraGejdos/OG-star-tracker-/tree/main/Firmware
Or you can use our newly developed pcb to unlock more features. Also you dont need to wire it
https://github.com/OndraGejdos/OG-star-tracker-/tree/main/esp32_wireless_control
Printing instructions :
Print all parts at 100% infill, except for the following where you can use lower infil:
·Large pulley: 50% infill
·Ball head holder: 50% infill
·Between part: 50% infill
·Stationary part: 50% infill
You can use a 0.6mm nozzle for faster printing
Use PLA as the printing material
Parts are oriented in the printing position
Use support only on these specific parts:
·Main part: overhang angle 60°
·Attachment for slider: overhang angle as specified by your slicer
If you think something is missing, please message me.
Soon, I will upload a bottom main part for those living below 20° latitude.
Clear skies!
Usage guide
You need to first turn it on.
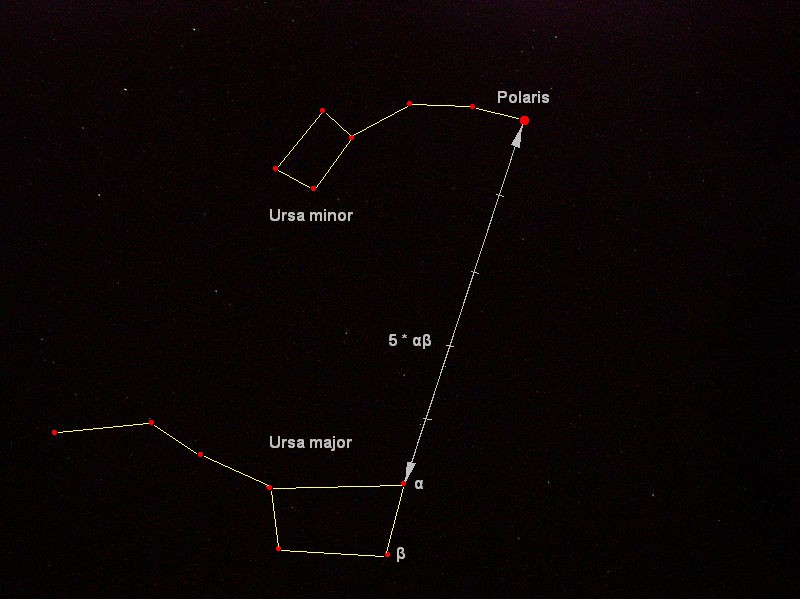
Then you would point laser at polaris.
Then you can point at any celestial object and start shooting.
DEC upgrade RADEK
This is a first version of the DEC upgrade. Its a beta version for testing. It works but its not very good. Another versions will be released. This version is too wobly.
Printing instuctions
All parts are in correct printing orieantions.
DEC_Arca_clamp_moving and DEC_Arca_clamp_static are espectialy in correct orientation. With this orientation you will achive better strenght.
You dont need to use any supports.
Firmware
Follow this manual : https://onstep.groups.io/g/main/wiki/32776 . You will select DOIT ESP32 DEVKIT V1 insted of ESP32 Dev Module. You will also skip these steps :
From the menu Tools->CPU Frequency make sure 240MHz is selected.
From the menu Tools->Partition Scheme pick Huge App.
You need to insert the second driver into the DEC port on OG star tracker board.
Firmware is configured for 400steps stepper motors.
Firmware is in Other files.
Parts
List of parts : https://docs.google.com/spreadsheets/d/1wDacUMOmuyAZHEJ4omYCk_B2ISvhE9PlwDDFOTmZTsU/edit?usp=sharing
Assembly
For the 8mm rod you will use m8 taper for first 18mm.
You will attach first the dec base to the big pulley. After that you will attach stepper motor to the DEC_Main_part and screw the DEC_Main_part to DEC_Base.
Should I build dec upgrade ?
The dec upgrade is another axis that allows you to have go-to and computer control of the mount. If you plan to use wide field angle lenses(=<135) than the dec upgrade is for you pointless because you can easily find it on sky and you don't need the go-to and guiding because the mount is more than capable to handle this focal lengths. If you are not skilled hobbyists I would advise against building the dec upgrade because it's not as easy to build thanks to lack of tutorials. Based on this you can decide.
Updates :
20.1.2023 : between part so it better fit onto bearing
22.1.2023 : Main base and M5 holder files
23.1.2023 : updated rotating bearing holder.stl so the bearing have tighter fit (you need to reprint it)
9.2.2023 : updated the main base and door.stl
Clear skies.
11.2.2023 update main part.stl and ball head holder
10.5.2023 overall upgraded version
19.8.2023 First dec upgrade


