Suspended Baby Raptor Incubator LED Lamp

Remixed by
Copyright Claim

Suspended Baby Raptor Incubator LED Lamp

Remixed by
Boost
1237
1922
107
GIF

Print Profile(2)

All
P1P
P1S
X1
X1 Carbon
X1E
A1
A1 mini

0.2mm layer, 2 walls, 10% infill
Designer
26.7 h
4 plates
4.3(54)

[A1 mini] 0.2mm layer, 2 walls, 10% infill
[A1 mini] 0.2mm layer, 2 walls, 10% infill
32.7 h
5 plates

Boost
1237
1922
107
2
2.7 k
909
Released

Description

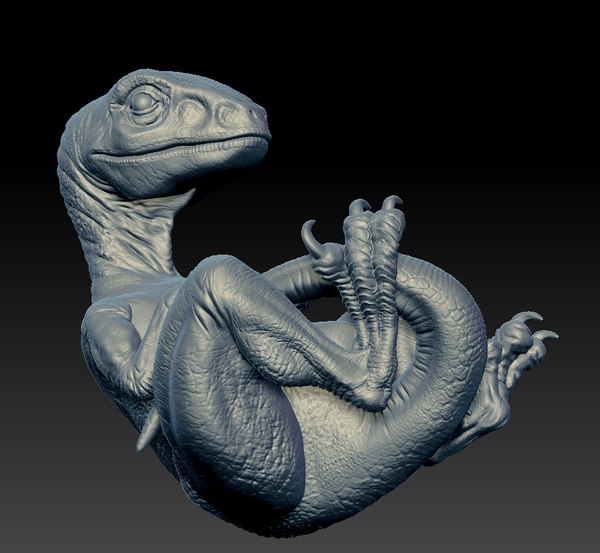
So i just got myself the LED lamp kit and was looking for a cool lamp shades to print for it.. then i came across someone making a incubator like cylinder with an alien in the middle using resin.. i thought it was a great idea.. and so i design one for myself.. but of cause i want to make a suspended version of it..


Then i remembered finding a baby raptor model on makerworld.. it was made for resin printing.. so i low-poly the raptor and added the baby raptor blue and turned it into a suspended model.. i had to split the raptor in 2 and added supports to the hanging hands.. legs and tail.. so it might look weird if you look closely..


:UPDATE: it turns out that the user who shared the raptor model on makerworld is not the owner of the 3D model.. he shared the file without authorization.. The owner reached out to me and told me what the user had done.. the owner of the 3d model is wofle from turbosquid.com.. and he gave me permission to share my remixed version of the raptor as long i dont sell it commercially.. so thank you Mr Wolfe for sponsoring your awesome raptor model for my suspended models..


i modelled the incubator using Tinkercad and added the LED kit on the bottom.. so the LED light would shine through the bottom grill of the incubator cylinder and light the suspended baby raptor in the middle..


If you have an AMS i recommend printing some of the incubator parts with transparent filament like i did for the bottom base.. so that the LED would shine through it and make it more cool.. in my opinion..


Assembly is fairly simple.. you just need to be careful when adding the square peg into the raptor's body.. it should fit loosely.. the peg is just used to hold the 2 half of the raptor aligned.. the bottom parts should fit tight.. and the top slightly loose.. the base where you insert the LED kit should fit loosely to the middle base.. so that you can turn your raptor to whichever position you'd like without the wires in the way..
 

If you're thinking of buying the LED kit.. please do support me by using my affliate link here.. LED LAMP KIT 001 every little things helps me out..

If you would like to support me, you can join me on my buymeacoffee page..

By joining me as a supporter.. you'll be able to get behind the scenes information

on my current projects as well as future projects..

And if you're looking to sell my prints.. you can join my merchant membership tier as low

as USD10 a month..

Comment & Rating (107)

Please fill in your opinion
(0/5000)

Perfect!
The designer has replied
13
Reply
Dude.. Your multicolor looks awesome.. Love the bottom glow of the incubator
1
Reply
Replying to @fay3dlab :
Thanks!
0
Reply
Print Profile
0.2mm layer, 2 walls, 10% infill
Overall a really nice print, love how it turned out.
The designer has replied
7
Reply
Great work printing multicolor.. Now all you need is to buy the bambulab LED kit 001
0
Reply
I am going to pick it up, it’ll really set the model off! Thanks again! :)
(Edited)
1
Reply
I ran it thought Fusion today and turned the center tube into 3 componets. Tube, Raptor and strings. Now you can change the colors as you like. Next trick is to try to print it.
The designer has replied
2
Reply
You don't have to use fusion.. You can just color it using bambu studio.. The model is already separated for multicolor.. I even added stripes on the back of the raptor
0
Reply
Replying to @fay3dlab :
True. But now you have to paint. Why are the string holes .2x1.2? I am new to this type of printing.
0
Reply
The string holes is slightly larger so that when its sliced.. The slicer have to extend the strings into the model and not just end at the edge of the model wall.. Try looking at the sliced model and you can see what I mean..
0
Reply
love the concept. but I made a larger model. It would be nice to have link for the pla you used. and what type of light you used also. appreciate the time and effort to create this 🌟 🌟 🌟 🌟 🌟
(Edited)
The designer has replied
2
Reply
i used polyterra pla for the raptor and a local brand pla silk for the incubator.. the light is from bambu lab store.. the LED kit 001
2
Reply
Replying to @fay3dlab :
thanks much appreciated
0
Reply
Replying to @K3YPT1C :
you're welcome.. happy 3d printing
1
Reply
Didn't come out perfect due to the alignment because of the strings once I lifted it but nonetheless very happy with it. awesome print and perfect profile. Even printed in ASA it came out nearly flawless.
The designer has replied
3
Reply
Those colors are awesome.. What happen with the alignment? Did you put the square peg inside the raptor yet? That should help with the alignment
0
Reply
Replying to @fay3dlab :
No I didn't as I was having major issues with moving the raptor around without damaging what few bridges I had left so i just super glued it together. I honestly think the major issue with the alignment happened when it got removed from the bed is all, as i said the issues i had were not caused by your print profile :)
0
Reply
Print Profile
0.2mm layer, 2 walls, 10% infill
having a hard time printing it on my A1 I can only orint threw the app so I can’t add a brim to it. it seems like because of how thin and small the surface area of the strips that print with each half of the Dino they keep popping of the build plate like the don’t have enough area to grip down I was able to get the Dino to work but half way threw the post pop off the plate
The designer has replied
0
Reply
you'd need really good bed adhesion.. there's a lot of tutorials on how to clean your bed for good bed adhesion on youtube.. or if you're lazy than just buy the glue..
0
Reply
I cleaned it to make sure I even ran a calibration run before and still the post keep popping of the plate I had print work both before and after trying to print this I know the plate I’m using doesn’t need glue from what I’ve looked up I even made sure I cleaned it correctly and all that
0
Reply
the post pop off once they get to round half an inch tall ands it’s like 2-3 of them that pop off and it’s not the same ones either so idk I even sat next to it to babysit it after I cleaned the plate and saw the moment it unstuck from the plate i tried holding it down to see if the heat of the bed would stick it back down but the another one popped off 🤦
0
Reply
Worked great, thanks
The designer has replied
1
Reply
wow.. the red and green makes it looks creepy and awesome..
0
Reply
Print Profile
0.2mm layer, 2 walls, 10% infill
it took me a few try to get it to print adequately. The print came out pretty good.
2
Reply
very nice
2
Reply
Print Profile
0.2mm layer, 2 walls, 10% infill
a little stringing. may be my settings
The designer has replied
0
Reply
did you change the filament type and brand? those settings are not included in the 3mf.. you might want to change the settings to follow the brand of filament you use
0
Reply