N Scale Train Trestle Display
N Scale Train Trestle Display


Print Profile(1)
Description
Summary
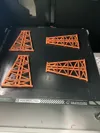
I put together these trestles to use as display stands for N gauge engines. One is 10.5 and the other is 5 inches long, but one could easily be made to any length. It is loosely based on a Great Northern Railway Standard Frame Trestle design that I found on the web.
I used a Prusa 3 to make this so some of these recommendations may not work quite the same with another printer, but I describe what I did here. I used PLA, and the layer height was set to the default 0.15 mm. And for the one part where I used supports, I used all the default settings too.
All the parts, except for the Main Frames can be printed without supports. Using supports with the Main Frame STLs take a while to clean up, but I found that they were strong and looked good when I was done. Be careful not to cut yourself when digging the support material out with an Xacto knife. Blood just ruins a good print…
For the small trestle you need to print 5 Main Frames, 2 SideBraces, 12 Runners, 1 Bridge Top 1, and 1 Bridge Top 2. And for the large trestle you will need 10 Main Frames, 4 SideBraces + 2 CrossBraces, 12 Runners, 1 Bridge Top 10.5in 1, and 1 Bridge Top 10.5in 2.
The SideBraces STL is made up of 5 CrossBraces STLs, laid out in the correct pattern for attaching to the side of the Main Frames. I let The Cross Braces overlap each other to maintain their relative position for each set. The CrossBraces.STL needs to be rotated 12 degrees to lay it flat on the print surface.
After printing the SideBraces STLs, but before removing them from the print surface, I laid some wide low-tac painters tape across them, to maintain their relative position after they were removed. Make sure that you can see 1/16 in of the tops and bottoms of the SideBraces after the tape is applied. This will make it much easier to position them when assembling the bridge.
For assembly I snapped the Spacer Jigs on to the 5 Main Frames. I should have made the gaps in the Spacer Jigs a little wider, but I wanted them tight. I found that I needed to file the Spacer Jig gaps wider, and to file the sides of the Main Frames thinner, so the Spacer Jigs did not bend when they were snapped on. I made 4 Spacer Jigs. Once I had them holding the top, bottom, and one side of the Main Frames, I attached the SideBraces. I used a BD-25/2 “Low Density Polyethylene Bottle Applicator” (See more below) to apply drops of Acrylic Cement to tops and bottoms of the Side Braces then fitted the taped SideBraces to them. I then removed the tape, and put a drop of cement on each if the intermediate joints.
After the SideBraces were attached to one side, I removed the Spacer Jigs from the other side, and used the technique described above to apply the SideBraces to that side.
I redesigned the Spacer Jig when I made the 10.5in trestle, because the old jig was a pain to use. The 10.5in is much easier to use, but the assembly process is the same.
The Bridge Top 2 part was then cemented to the top of the Main Frames. The cement works really fast, so I just eyeballed it to center it, and held it until the cement had taken hold.
I then added the Runners. Tilting the assembly to one side, glued in half the Runners, then tilting the other way, added the rest. I used a pair of scissors to cut off the ends so they would be equal length.
I used the rails from Atlas Code 55 Flex Track for the main and safety rails. If you live in the Portland Oregon area, I would highly recommend Tammies Hobbies (https://www.tammieshobbies.com/). This is a local store for me, but their store prices for train related stuff is competitive with anything that I can find elsewhere on the internet. But enough with the pitch.
Cut 4 rails and file to length with a fine file. Cut the corners on the end of the track to make it easier to slide in the Bridge Top 1 part. The rails fit very tight. I pushed then in just a little bit, then took the bed of my printer up to 70 degrees C and laid the part with the rails partially inserted upside down, to warm them up. I then gripped the rails with a needle nosed pliers a 1/2 inch from the part and slid them in a little farther. I repeated the warming and short press steps several times to get the rails full inserted. Once this is done, the Bridge Top 1 part can then be glued to Bridge Top 2 part.
Some notes on gluing tiny things…
I purchased the Bottle Applicator and Acrylic Cement from Tap Plastics.
Bottle Applicator: https://www.tapplastics.com/product/supplies_tools/plastic_tools_supplies/hypo_type_solvent_cement_applicator/409
Acrylic Cement:
https://www.tapplastics.com/product/repair_products/plastic_adhesives/tap_acrylic_cement/130
The web page says that the Acrylic Cement is for INDUSTRIAL USE ONLY. This is because it is made up of Methylene Chloride (75-09-2), Trichloroethylene (79-01-6) and Methyl Methacrylate Monomer (80-62-6). ONLY use in a well ventilated area!!! Not only does it smell bad, but inhaling it can hurt you. So treat it with respect. Fortunately a little of it goes a long way, so the fumes from tiny drops are minimal. And don’t forget that it is also flammable!
This is probably the most volatile stuff I’ve ever used. When it comes to evaporation, it makes alcohol look like motor oil. There was an 1/8 inch of it in the bottom of the applicator and it was gone the next day. And this was with the syringe top tightly screwed on, and the cap on it. Also, after 4 months of sitting the garage a 4 oz. container of the stuff that was almost full when I put it on the shelf, was empty! I found that the seal on the container is junk. After tightening as hard as I could, I could tip the container and the stuff would still drip out. My solution, which has worked pretty well, was to store the Cement container in a coffee can with a plastic cap. My theory was that, even with the leaky Cement container, the solvent vapor pressure would equalize inside the coffee can, and slow the evaporation process. But hold the coffee can away from you when you open it, otherwise you will get an eye watering whiff of the stuff.
To fill the Bottle Applicator, just squeeze some air out of it, then stick the syringe into the bottle. It takes a minute, but the stuff will be sucked in to the bottle. I found that I never needed very much. An 1/8th of an inch in the bottle, will go a long way. Besides anything you leave in the applicator will evaporate away within a day.
With all this said, a friend said that Acetone was just as effective a cement for PLA. Being a cheapskate, I will try it as soon as my current supply of Acrylic Cement is gone.
Also…
When using this Cement with the Bottle Applicator, its volatility comes into play. Normally you tip the Applicator and give it a squeeze to get a single drop of cement to come out, then relax your grip to cause an additional glue to be sucked back up the syringe. But because this stuff is so volatile, the heat from your fingers causes it to expand, so instead of a single drop, the expansion of the cement inside the bottle causes it to start dripping immediately. Even if you stop squeezing. This will flood your print with glue if the syringe is against it and make a mess. I found the best way to get a single drop was to hold the tip above a piece of cardboard, quickly tilt it to get a drop to come out, then tilt it back immediately, but no so much that the cement reaches the end of the syringe inside the bottle. The ‘tilt back’ causes the drop of cement to slide back to the working end of the syringe, without additional drips landing on your work. Note; this only works if there is just a little solvent in the bottle.
Print Settings
Printer Brand:
Prusa
Printer:
Rafts:
No
Supports:
Yes
Resolution:
0.15
Infill:
20%
Filament: Hatchbox PLA White
Notes:
Only used support for Main Frame.stl. 0.4mm nozzel. Used default settings everywhere.


