Revolver II : Double & Single Action | mechanically working Prop Gun

Remixed by

Revolver II : Double & Single Action | mechanically working Prop Gun

Remixed by
Boost
171
324
33

Print Profile(5)

All
X1 Carbon
P1S
P1P
X1
X1E
A1
A1 mini

0.12mm layer, 2 walls, 15% infill
20.7 h
9 plates
5.0(15)

0.12mm layer, 2 walls, 15% infill
20.3 h
9 plates
4.8(5)

0.12mm layer, 2 walls, 10% infill
17.7 h
3 plates
5.0(1)

Revolver 150% scale 0.12mm layer, 2 walls, 100% infill
65.9 h
9 plates
Click to see more

Boost
171
324
33
13
598
508
Released

Description

--ATTENTION - THIS IS PORTED FROM PRINTABLES FOR EAISER PRINTS--

--ORIGINAL LINK - https://www.printables.com/model/552686 -


Hi there!

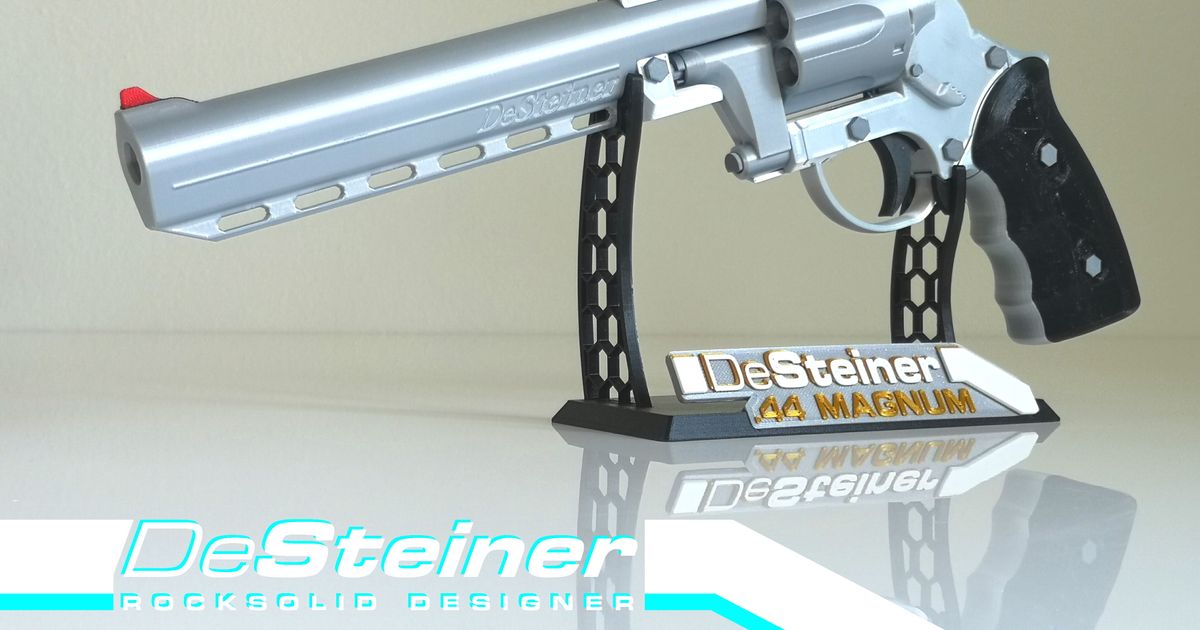
No matter how old you are, if you watched movies or played games and thought “man, I'd love to play around with a Revolver myself!”, then ladies and gentleman, your time has come!

Works great as a Cosplay accessory too! The working mechanism is definately an eye catcher! But fear not, IT CANNOT SHOOT! May not be wise to carry it in non-convention public though, it looks quite realistic.

This project took a lot of time and effort, yet it is available for free!
While I already made a single-action only Revolver 5 years ago, I completely overhauled most of the design with three key targets:

  • Both double- and single-action shall be possible:
    No need to cock the Hammer before each trigger pull anymore. While you can still do that, it also works now to directly pull the trigger, which took me some time to figure out how to do that.
  • No more need for screws or any non-printed parts in general:
    Because if I got a Dollar for each comment asking “where can I get them screws bro?” I would probably be rich by now. But yeah, screws are different throughout the world so this makes perfect sense.
  • More robust design:
    The original design had small axle pins on the main body, which broke easily for some people. Having to reprint the largest part just because of a small pin sucks, so the new design fixes that. The Speed-Loader is also completely new and much more sturdy, so it wont break the first time you drop it.

And I am very happy with how it turned out. It even got prettier in the process.

While 3d-printing does not have a lot of true limitations, I love models which are easy to print with large flat bottom surfaces, no need for supports, proper connection solutions without the need for glue, simply overall thoughtfully designed. Following my own Rules that come with the DeSteiner brand makes the design process much more complex, but results in a much more satisfying printing process. I spend some extra time, so thousands of you guys can save some. Speaking of extra time, there are also step-by-step assembly instructions full of tips and extra information. Be sure to make use of that.

So here it is. The DeSteiner Revolver-II, working like a charm.
I hope you enjoy it as much as I do!

And you get all of it for free!
If you value my work, I would highly appreciate it if you sent me a tip!
That keeps me motivated to do more in the future.
Don't forget to share your makes, too!

Yours,
Tobias ~DeSteiner


Documentation (3)

Bill of Materials (2)
552686-revolver-ii-double-single-action-mechanically-working-prop-gun-315f23ff-1f77-4fd1-b9f0-5ed94f5ad5ec_6a95a6ad-06b6-4635-ba2a-27b1dd7a5cb9.pdf
revolver-next-gen_exploded_ec6e1bb6-98e7-43a3-b1df-5c408f2b251b.pdf
Assembly Guide (1)
Assemly Instructions Revolver-II_1d6f589c-bebc-4997-82ad-a9a0f8b27c1d.pdf

Comment & Rating (33)

Please fill in your opinion
(0/5000)

Print Profile
0.12mm layer, 2 walls, 15% infill
Everything printed out beautifully and all of the tolerances were bang on. Superb model.
1
Reply
lovely! I do have a question , why can't I find the filament stub 4mm& 7mm?
0
Reply
Replying to @user_2537261706 :
Take some scissors and cut any filament of yours to the required length. It's not a printed item.
0
Reply
Print Profile
0.12mm layer, 2 walls, 15% infill
Assembly was painful
(Edited)
1
Reply
wow what is this filament ? very beautiful
0
Reply
Boosted
Print Profile
0.12mm layer, 2 walls, 15% infill
it's great
1
Reply
I need to reprint a few parts that I am not quite satisfied with (printed the trigger on a textured plate, and like a dummy, I printed the grip wraps flat down, which made them look like a hard to read topology map -- Edit - replaced them now), but overall, it is great. I put a pause in the g-code while printing the bullets and put some steel BB's in them with some sliced up filament as filler to keep them from moving around. It added some nice weight to them. I also replaced the hammer spring with two slightly stiffer small metal springs and it made a nice difference in the overall feel. The default one was just a bit too weak for my liking. I also did some sanding on the cylinder swing arm's internal faces at points of friction to give it a much smoother travel. Aside from that, it would be great if there was a way to be able to tighten up the tolerance between the cylinder and it's rod while still allowing it to spin freely. As of course, the first thing I attempted to do when I got it all together after sanding the sing arm was give it a solid spin and flick it closed. Alas, there was too much wobble unless you hold it pretty close to vertical. All in all, extremely well designed (and configured in the slicer settings). Extremely, highly recommended whether guns are your thing or not (perhaps you just like sitting around while in Teams meetings pretending you are in the wild west). It's very satisfying to print and put something together that is this well designed.
(Edited)
1
Reply
Print Profile
0.12mm layer, 2 walls, 15% infill
printed out great
0
Reply
Say, where did you get the snub barrel from? Looks like a great print!
0
Reply
thank you my hero~~~
0
Reply
Perfect engineering. I came across some issues (probably my printer caused them) and gave up on the last one. First. The main body printed 2 main support walls stringy and therefor weaka nd they broke during assembly. I ended up glueing both back in. Added some pictures. Second. The mechanics are sticky when i close the cover. all moves freely when its open and no pressure appplied. as soon as i put in the "screws" things get sticky. I tried shavign off areas i thought causing it but it didn't help. I believe it comesf rom printing on a rough PEI plate. I also noticed trying the get the elephant feet off that there is a tendency to peel off part of the first layer too. I did lower the speed considerably but not as low as mentioned in the assembly documents. Lesson learned to RTFM first. I do love th results, and i will try to re-print everything with much smaller speeds to see if that solves all the problems.
0
Reply
nice model !I like it~
0
Reply
Very easy print, trigger was a little frustrating to assemble and there are a few parts to manage but overall was worth it and extremely well designed.
0
Reply
Print Profile
0.12mm layer, 2 walls, 15% infill
Good model. Assembles well. Easy to print.
0
Reply