Finally at last here is the Kingroon KP5L Essential MOD Kit.
But let’s talk about the Good, the Bad, and the Ugly.
First the Good:
The KP5L seems like it checks all the right boxes to be a great printer: dual linear rails on all three axis, a metal housed Titan (knockoff) direct drive extruder, a fairly large build area (310mm x 310mm x 340mm), an insulated heated bed, a filament runout sensor, a (small, but functional) color touch screen, and dual Z-axis... all for about $200. I ordered one on a Black Friday deal for $160 with free shipping. Once I saw the quality of the basic components I literally ordered a second KP5L a few weeks later before I even got the first one working properly. There is very little plastic components, most of this thing is built like a tank.
Ok, the Bad:
The stock firmware is crap. I mean really bad. The mainboard is a re-branded MKS Robin Nano (the early crappier version, not that the newer Robin Nano is much better). I spent a week rewriting both the Robin Nano firmware and a Marlin port, but luckily someone beat me to the punch and published an excellent Marlin firmware for the KP5L, so I was able to move on. Thanks to Mechano on GitHub you can download Marlin firmware that brings the KP5L up to par. But I choose to run Klipper which doesn’t use the screen but makes the printer faster and the prints higher quality. Pick your own poison. So the Bad is pretty much solved.
Now we get to the Ugly:
The KP5L has some serious engineering flaws, which is probably why it is poorly rated. It's like they built a Ferrari but installed the steering in the back seat, forgot to install the head gasket, and gave you a roll of paper towels instead of windshield wipers for when it rains. Yeah, it's real Ugly, and while you can drive it you must do so with caution. So let’s go over those ugly engineering issues that I needed to solve.
Cable management. It’s beyond terrible. The ribbon cable going to the Z-Axis junction box will probably get caught on the bed as it moves. The cable going to the heated bed will probably come unplugged if not rip completely off. The bundle of wires going from the Z-Axis junction box is in a nice sleeve you usually pay extra for, but it droops so low it touches the bed and will definitely snag your model during printing eventually.
The cable the plugs into the heated bed needs some sort of brace to keep it plugged in, and it also likes to get caught on the Y-axis motor. It’s a disaster waiting to happen.
The filament runout sensor is mounted on the Z-Axis junction box, which means you are supposed to place your filament spool on these flimsy rollers provided at ground level. The filament then feeds UP through the sensor, makes a HARD RIGHT turn to your print head, goes OVER a feed lever, and then makes another HARD RIGHT down into the extruder. I don’t know what they were smoking that day during the design phase, but the engineering team, the manager, and the QA department all took a big toke on that pipe.
The bed sits so low that the padded insulation underneath has zero clearance when the bed moves backwards. I don’t mean it’s really close, I mean it will snag the Y limit switch and/or the Y-Axis stepper motor and get torn/worn off.
That’s pretty much the worst of it. But remember… I bought two of these so I am committed, or should be committed to an asylum.
That being said, here is how I turned this dysfunctional Ferrari into base model Lexus with just a few 3D printed parts (a few of my designs and a few other designs) and maybe $5 in ‘other’ parts. I can’t say it’s a Ferrari, but with all those major engineering issues solved I now have two workhorse printers that can put my Ender 3 to shame.
First, we had to fix those cable management issues. You’ll notice in the kit I have multiple parts for this. One guides the ribbon cable at the bottom and prevents it from snagging the bed, and another is a guide for the filament runout sensor cable because we are going to move that to a new home. Both of these parts mount on the back of the left side carriage support using M4 screws and the threaded holes already there.
*** DISCLAIMER *** As an Amazon Associate, I earn from qualifying purchases.
Here is a nice M2,M3,M4,M5 bolt nut and washer kit on Amazon:
https://amzn.to/44m64XQ
To prevent the extruder and print head cable bundle slack from literally resting on your hotbed or model, there is a 3D printable wire-bundle guide I designed that mounts where the filament sensor used to be (We will be moving that where it belongs, up top!).
Two of the parts are not my designs but I included them here so everything would be in one place. However, I have given them credit below. Please check out their other designs.
For the heated bed plug, someone else solved that issue with a 3D printable PETG coupler. This is the only part you should probably print in PETG since it clamps onto the heated bed. Shout out to Ober https://www.thingiverse.com/thing:6047023 for this 3D model.
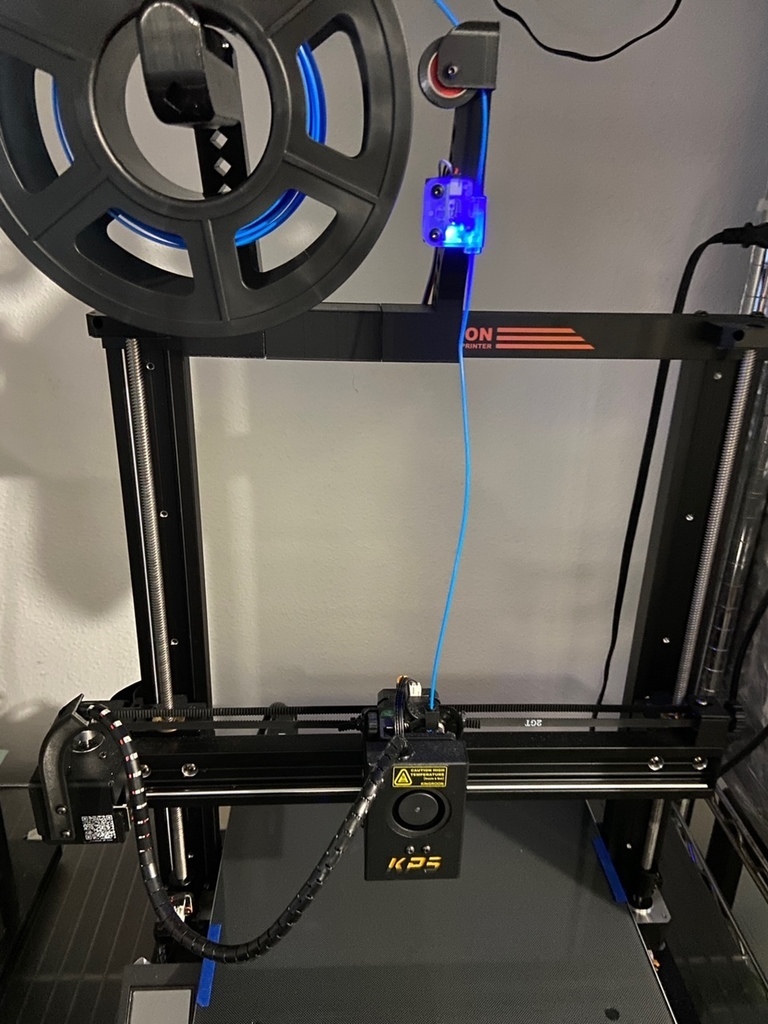
We are also going to move the roll of filament to the top of the machine using an excellent spool holder for the KP5L that was already designed by BISAIRO https://www.thingiverse.com/thing:5428476. This spool holder uses two standard 608 skateboard bearings.
Here is a link to the 608 bearings:
https://amzn.to/3QNCxmR
Now that we have the spool on top, it can feed straight down into the extruder. But we want our runout sensor back and a guide. I designed a filament sensor guide bracket with a pulley wheel that also uses a standard 608 skateboard bearing. You can use any 608 bearing like 608XX, 608RS, etc.. The filament runout sensor mounts directly under the pulley wheel.
The top rail spacer serves two purposes. First it keeps the pulley and runout sensor bracket the perfect distance from your spool of filament. Second, it is also is a wire guide for the runout sensor. All wires pretty much stay hidden and out of sight.
Last but not least, we need to prevent the insulation on the bottom of the bed from hitting the Y end-stop switch or stepper motor. I’ve seen some people actually cut off the insulation, but there is a much better solution. Instead of the springs, use silicone spacers. My spacers were not quite tall enough so I simply put a 3mm thick rubber washer under the spacer. Now I have 2-3mm of clearance and no issues.
Here is a link for rubber washers shown in the photo:
https://amzn.to/3U01rPQ
Now we have the KP5L how it should be, mostly. There are a few other quirks that I noticed on this journey:
This printer emits some serious EMF. I tried to get a BL Touch to work with it (there is actually a set of undocumented pins inside the Z-axis junction box for connecting the BL Touch). But this means your BL Touch will be running on the same ribbon cable that is powering your extruder stepper motor, X-axis stepper motor, and heater cartridge for your hotend. This makes the BL Touch deploy and retract randomly, and it goes absolutely bonkers when the bed is heated… like its approaching a giant electromagnet. I used manual mesh bed leveling and don’t need to use the BL touch. Manual mesh bed leveling has worked so well I have considered removing the BL touches from my Ender 3v2 and Voxelab Aquila. But they say if it ain’t broke don’t fix it.
The EMF noise is also so bad I’ve had a few intermittent disconnects using my Raspberry Pi and OctoPrint. This really sucks because you could be 9 hours into a print and it loses connection for half a second and you can’t resume. As an added bonus, this type of disconnect just leaves the printer in a frozen state with the nozzle and bed heated. I’ve built specially shielded unpowered USB cables for my all my printers and added a ferrite bead: problem solved.
Here is a link for snap on ferrite beads to block EMF:
https://amzn.to/3Q1QbkO
:format(webp)/https://fbi.cults3d.com/uploaders/30391954/illustration-file/358e80a2-b5bc-4bd8-ba53-7ffbb88247ba/e3cd7c1c-b118-4755-9a73-feb43b06f647.jpeg)


/https://preview3d-images.cults3d.com/6shg8pc2twntguag09m4tuft1dfx)
/https://preview3d-images.cults3d.com/cp7wfwjaj76qex4deimb6garc12f)
/https://preview3d-images.cults3d.com/bvaj27e2fryjf3mzj6nwgkosrms2)
/https://preview3d-images.cults3d.com/rihlgbuy9r0iw91754gtuuqvggg3)
/https://preview3d-images.cults3d.com/mj3w84gpyw2dsm59jt82lny8785e)
/https://preview3d-images.cults3d.com/91onyqxvvnj7faqhld7wcfpcxdc3)
/https://preview3d-images.cults3d.com/ivj1s8016yskc0ji14zjukd2vlsl)
/https://preview3d-images.cults3d.com/m8qswyrn240ukxjw5duebnlz9tos)
/https://preview3d-images.cults3d.com/jr09m5bd4m84nytqlahe4k00x6s1)
/https://preview3d-images.cults3d.com/p9kkktp95c8t1ozrsq55ylgjwa27)
/https://preview3d-images.cults3d.com/xm8ecqxnfkvt5ffg3a9cumhoendg)
/https://preview3d-images.cults3d.com/go9rcpyqdje201tgfczgon4nyc3i)


